

How to Set Up a Ceiling-Mounted Projector in a Compact Room
Creating a home theater or entertainment setup in a small room can be a challenge, especially when you want to maximize both performance and available space. A ceiling-mounted projector is one of the best ways to achieve a cinematic experience without cluttering the room. It keeps the projector out of the way, provides an optimal viewing angle, and gives your space a clean, professional look. With the right tools and planning, even a compact room can be transformed into a stunning visual environment. XTEN-AV provides advanced projector solutions and design tools that make ceiling-mounted installations simple, efficient, and precise.
Understanding the Benefits of Ceiling Mounting
Mounting a projector on the ceiling is an effective way to save space and improve projection quality. It eliminates the need for floor stands or tables, keeping your room neat and organized. Ceiling-mounted projectors also reduce the risk of accidental bumps or spills that can occur when the projector is placed on a surface.
Another major benefit is alignment. A ceiling mount allows the projector to be positioned directly in line with the screen, minimizing keystone distortion and maintaining image clarity. XTEN-AV’s projector design systems can help you calculate the ideal mounting height, distance, and alignment for your room layout, ensuring perfect projection every time.
Choosing the Right Projector and Mount
Before you start installation, selecting the right projector and ceiling mount is crucial. Since the goal is to optimize a compact room, choose a projector with a short or ultra-short throw lens. These models can project large images from short distances, making them ideal for small spaces.
Pay attention to brightness and resolution as well. For compact rooms with controlled lighting, a projector with around 2000 to 3000 lumens works well, while 1080p or 4K resolution ensures sharp visuals. XTEN-AV offers projectors that combine these features with quiet operation and sleek designs suitable for ceiling setups.
When it comes to mounts, look for an adjustable ceiling mount that supports tilt, swivel, and rotation. This flexibility allows you to fine-tune the projector’s position for the best image alignment. Make sure the mount is compatible with your projector’s weight and has a secure locking system for safety.
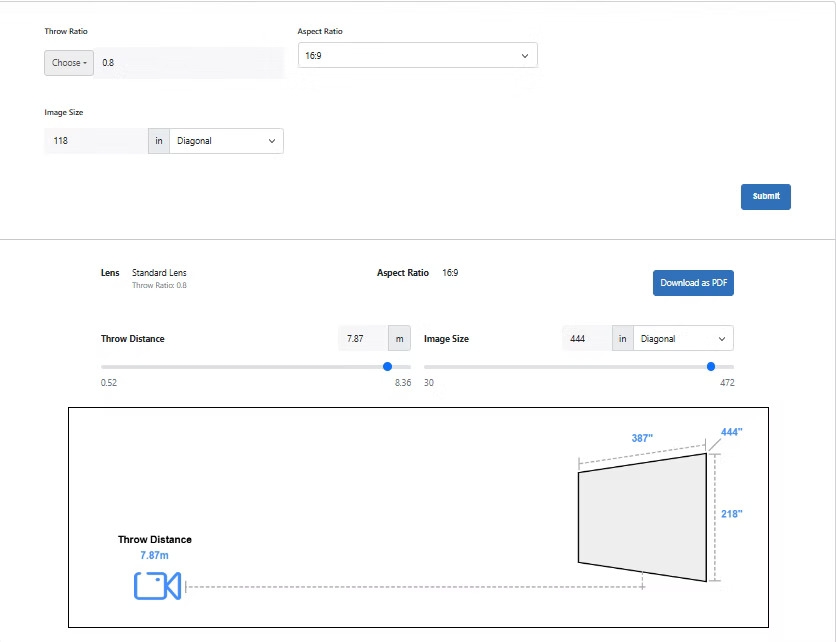
Determining the Perfect Placement
Finding the correct position for your ceiling-mounted projector requires attention to detail. You need to calculate the throw distance, which is the space between the projector lens and the screen. This distance affects image size and focus.
You can find this information in the projector’s manual or use XTEN-AV’s design tools to calculate it automatically based on your room dimensions. For small rooms, you may need to experiment with different distances to achieve the perfect image size.
Mounting height is another key factor. Ideally, the projector lens should align with the top edge of the screen or slightly above it. This ensures a straight projection and minimizes distortion. If you plan to install the projector on a sloped ceiling, choose a mount with an adjustable extension arm that allows for angling and fine positioning.
Preparing the Ceiling for Installation
Before drilling any holes, identify a secure mounting point on the ceiling. You should anchor the mount into a ceiling joist or solid beam for stability. Using a stud finder can help you locate these structural supports. Avoid attaching the mount directly to drywall alone, as it will not hold the projector’s weight securely.
Mark the mounting points using a pencil and measure carefully to ensure they are centered with your screen. Once marked, drill pilot holes and attach the mount bracket using the screws provided. Make sure the bracket is level before tightening it completely. A small misalignment can lead to uneven projection or cause strain on the mount over time.
Attaching and Adjusting the Projector
Once the ceiling bracket is installed, it is time to attach the projector. Most mounts include a plate that screws into the projector’s base and then connects to the ceiling bracket. Secure the projector firmly but avoid overtightening screws, as this can damage the mounting points.
After mounting, adjust the angle, tilt, and rotation of the projector to align the image with your screen. Turn on the projector and project a test image. Fine-tune the alignment by making small adjustments until the image is perfectly centered and rectangular.
XTEN-AV projectors come with keystone correction and lens shift features that make this process easier. Keystone correction digitally straightens the image, while lens shift allows you to adjust the image vertically or horizontally without moving the projector itself.
Cable Management and Power Setup
A clean setup requires proper cable management. Dangling wires can ruin the look of your minimalist room and create potential hazards. Use cable covers or conduit channels to hide power and HDMI cables along the ceiling and walls. If possible, route the cables through the ceiling for a seamless finish.
You can also use wireless HDMI transmitters to reduce visible cables altogether. Ensure that the power outlet is nearby or install a new one close to the mounting location for convenience. XTEN-AV installation tools provide guidance for integrating power and connectivity layouts into your AV design plan efficiently.
Optimizing the Screen and Lighting
In compact rooms, screen size and lighting play a big role in the overall viewing experience. Choose a screen that matches the room size and projector throw distance. Retractable or motorized screens are ideal for small rooms since they can be rolled up when not in use, freeing up wall space.
Control ambient light by using blackout curtains or shades to improve image contrast. Dimmable LED lights or smart lighting systems can also help create the right atmosphere for viewing. Soft, indirect lighting behind the screen or along the ceiling adds depth without interfering with image clarity.
Testing and Calibration
After setup, spend time calibrating your projector for the best performance. Adjust brightness, contrast, and color settings according to your room’s lighting conditions. Many projectors include preset modes for movies, sports, or gaming, but you can fine-tune these to your liking.
Check focus and sharpness across the entire screen to ensure consistency. If the image appears uneven or skewed, recheck the mounting alignment or adjust keystone correction. Testing different content types, such as dark scenes and high-motion videos, can help you confirm that your setup performs well across all conditions.
Maintenance and Longevity Tips
To keep your ceiling-mounted projector running smoothly, clean the lens regularly with a soft microfiber cloth. Dust buildup can affect brightness and clarity over time. Make sure the projector’s vents are clear to prevent overheating, and check the mounting brackets occasionally to ensure they remain tight and stable.
If you are using a lamp-based projector, note the lamp’s lifespan and replace it as recommended by the manufacturer. XTEN-AV projectors are designed for longevity, featuring efficient cooling systems and long-lasting light sources that reduce maintenance requirements.
Conclusion
Setting up a ceiling-mounted projector in a compact room may seem complex, but with the right tools and planning, it can transform your small space into an impressive home theater. By selecting the right projector, finding the perfect placement, managing cables neatly, and optimizing your screen and lighting, you can achieve a professional-grade setup that looks clean and performs flawlessly. XTEN-AV makes this process easier with advanced design software, reliable mounting solutions, and projector systems that simplify every step of installation. A ceiling-mounted setup not only saves space but also delivers a true cinematic experience, turning even the smallest room into your private theater.
Read more: https://ekonty.com/blogs/459225/How-to-Build-a-Hidden-Projector-Setup-for-Modern-Interiors
