

How to Install Sage 50 Connection Manager on Server Step by Step?
Installing the Sage 50 Connection Manager on your server is a critical task for businesses that use Sage 50 accounting software in a multi-user environment. The Connection Manager manages access to your company data hosted on the server, ensuring smooth communication between workstations and the database. If you are looking for a clear, easy-to-follow guide on how to install sage 50 connection manager on server, this step-by-step blog will walk you through the entire process. For any challenges during installation, you can call Sage support at +1-844-341-4437 to get expert help quickly.
This post aims to deliver detailed and actionable instructions for installing Sage 50 Connection Manager on server systems to guarantee your accounting workflow is uninterrupted and efficient.
What Is Sage 50 Connection Manager?
Before diving into the installation, it’s important to understand what Sage 50 Connection Manager is. It is a service installed on the server where your Sage 50 company files are stored. This manager controls and manages access to those files for various users working on different workstations simultaneously. Properly installing and configuring the connection manager is essential for data integrity and smooth multi-user operation.
Prerequisites for Installing Sage 50 Connection Manager on Server
To ensure a smooth installation process, confirm the following prerequisites:
-
You have administrative access to the server.
-
The server meets the minimum system requirements to run Sage 50.
-
All previous versions of Sage 50 Connection Manager are uninstalled or updated.
-
The full Sage 50 software installation files or update files are available.
-
A stable internet connection if downloading files online.
-
Antivirus or firewall settings that allow Sage 50 to communicate over the network.
Step-by-Step Guide: How to Install Sage 50 Connection Manager on Server
Step 1: Access the Server and Download Necessary Files
Log in to your server computer with administrative rights. Visit the official Sage website or your company’s Sage software source to download the Sage 50 Connection Manager installation files. If you already have the full Sage 50 software downloaded on another computer, you can copy the installer files to the server via a USB drive or shared network location.
Step 2: Launch the Installer and Configure Settings
Once the files are on the server:
-
Run the
Launch.exeor executable installation file. -
Select your preferred language and click Install.
-
When prompted about Windows Firewall configuration, select the option to configure the firewall to allow Sage 50 communication.
-
Choose “Advanced” installation type to customize setup.
-
Select the option “Server-only” as you are installing on the server that will host the company data files.
-
Click Next and complete the installation process.
-
Once installed, select Finish to close the installer.
Step 3: Configure Windows Firewall and Antivirus
After installation, ensure Windows Firewall or any antivirus software allows the Sage 50 Connection Manager service and related ports through your network. This step is crucial for enabling workstations to access data stored on the server without interruptions.
Step 4: Start the Sage 50 Connection Manager Service
-
Locate the Sage 50 Connection Manager icon in the system tray or open it from the Start Menu.
-
Double-click the icon to open and verify that the service is running.
-
If the service isn’t running, manually start it by clicking the Start option within the Connection Manager interface.
Step 5: Verify Network Path and Connectivity
Make sure all workstations point to the correct network location where your Sage 50 company files reside on the server. This ensures consistent access and minimizes connection errors when users open Sage 50 from their computers.
Step 6: Test Multi-User Access
Finally, verify the installation by allowing multiple users to open and work simultaneously on Sage 50. Confirm there are no access errors or performance issues. If any problems arise, they might be resolved with firewall adjustments or reinstallation of the Connection Manager.
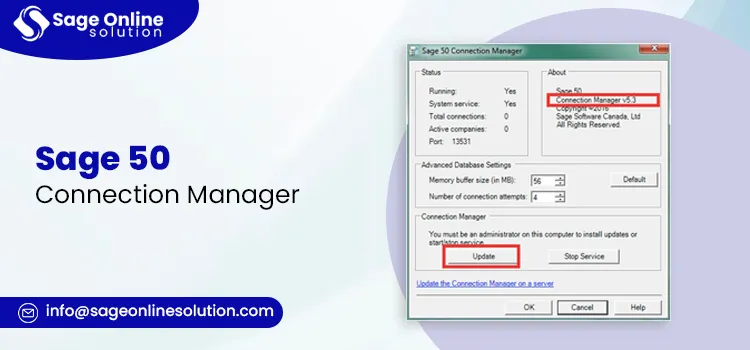
Updating Sage 50 Connection Manager on Server
If you already have an older version of Sage 50 Connection Manager installed, updating it is important for compatibility with the latest Sage 50 software. The update process generally involves:
-
Copying the latest update installer to the server from a workstation where it was previously downloaded.
-
Running the update executable on the server.
-
Restarting the server to apply changes.
-
Verifying the Connection Manager service is running correctly after the update.
Common Installation Issues and How to Fix Them
Problem: Installation Fails or Freezes
-
Ensure you have administrative privileges.
-
Disable antivirus temporarily during installation.
-
Confirm no conflicting versions of Sage 50 Connection Manager exist.
Problem: Service Not Starting After Installation
-
Open Task Manager or Services to check if Connection Manager service is running.
-
Manually start the service if it’s stopped.
-
Restart the server and try again.
Problem: Firewall Blocking Connections
-
Add Sage 50 Connection Manager and Sage 50 program folders to your firewall exceptions list.
-
Open required ports for Sage 50 communication.
Why Proper Installation of Sage 50 Connection Manager Is Essential
Installing the Sage 50 Connection Manager on your server correctly enables:
-
Controlled multi-user access to your accounting data.
-
Prevents data corruption from simultaneous data file edits.
-
Ensures Sage 50 runs seamlessly across networked workstations.
-
Improves system stability and supports future updates.
If you require any assistance or face technical difficulties during the process, Sage customer support is available at +1-844-341-4437 to provide expert guidance.
Final Tips for Installation Success
-
Always backup your Sage data before making system changes.
-
Confirm compatibility between the Sage 50 version on the server and all workstations.
-
Perform installations during low-usage hours to prevent workflow disruption.
-
Keep your Windows and network settings optimized for file sharing.
By following these steps, you will install and configure the Sage 50 Connection Manager on your server efficiently, enabling smooth and secure access for all Sage 50 users in your organization.
If you are ready to install Sage 50 Connection Manager on your server or need help resolving any issues during the setup, don’t hesitate to call Sage support at +1-844-341-4437 for prompt expert assistance.
This ensures your Sage 50 environment stays reliable and your accounting operations run without interruption
