

How Do I Avoid Hot Spots Caused by Wrong Placement
XTEN-AV has observed that one of the most common frustrations in projector setups is the appearance of hot spots on the screen. A hot spot is a bright, concentrated area of light that draws attention and disrupts the uniformity of the image. Hot spots are typically caused by incorrect projector placement, improper angle, or misaligned lenses. If you are wondering why is my projector blurry or how to fix blurry projector issues, hot spots may be contributing to uneven image clarity. Understanding how to avoid them is essential for creating a smooth and professional-looking projection.
What Causes Hot Spots
Hot spots occur when light from the projector is concentrated in one area instead of spreading evenly across the screen. This can happen due to several factors:
-
Incorrect Projector Distance: Placing the projector too close to the screen increases brightness in the center, creating a hot spot.
-
Improper Angle: Tilting the projector excessively or misaligning it with the screen can cause light to focus unevenly.
-
High-Gain Screens: Screens with very high gain can reflect light more directly toward the viewer, emphasizing any central brightness.
-
Lens Characteristics: Some lenses focus light more sharply in the center, causing a hotspot if placement is off.
When hot spots appear, the edges of the image may look dim or soft, leading to questions like my projector is blurry or projector blurry in certain areas.
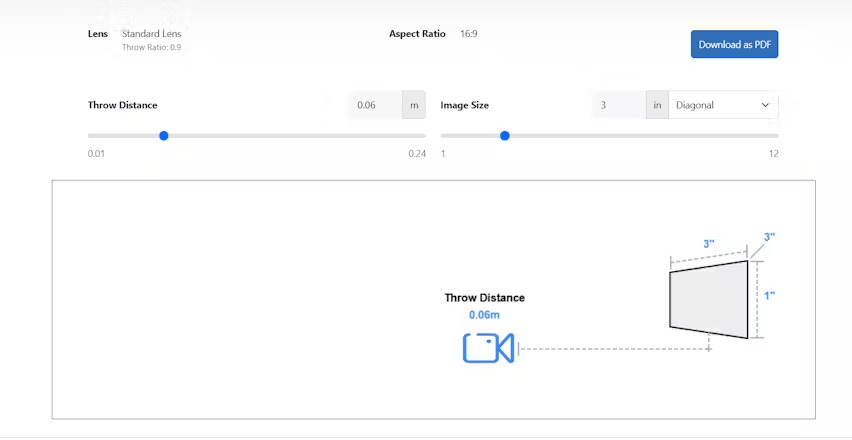
Step 1: Choose the Right Throw Distance
The first step in avoiding hot spots is to place the projector at the correct distance from the screen. Each projector has a throw ratio, which determines how far it should be to produce the desired image size. Placing the projector too close can concentrate light in the center, while too far can reduce brightness and sharpness. To ensure uniform illumination, calculate the throw distance based on your screen dimensions and the projector’s specifications. Proper distance also helps address why is my projector blurry in the center while the edges are sharp.
Step 2: Align the Projector Correctly
Correct horizontal and vertical alignment is crucial. The projector should be perpendicular to the screen and centered both horizontally and vertically. Using adjustable mounts or ceiling brackets allows fine-tuning of the projector’s position. If the projector is angled incorrectly, you may see hotspots and blurred edges. Ensuring correct alignment reduces the need for excessive digital keystone correction, which can make projector blurry effects worse.
Step 3: Adjust Focus Carefully
Even with proper placement, poor focus can exaggerate hot spots. Many users do not check focus across the entire screen and assume the center is representative. To avoid blurry zones and hotspots, adjust the focus at multiple points on the screen. Some projectors offer auto-focus features, but manual adjustment is often necessary for large screens or multi-projector setups. If you are asking how to fix blurry projector problems, checking focus can significantly reduce the perception of hotspots.
Step 4: Consider Screen Type and Gain
Screen gain affects how light is reflected toward the viewer. Screens with a gain of 1.0 provide neutral reflection, while higher gain screens focus light more directly, which can accentuate hot spots. If your projector blurry issues are concentrated in the center, using a lower-gain or ambient light-rejecting screen can help distribute light evenly. XTEN-AV recommends selecting a screen that matches your projector’s output and room conditions to maintain uniform brightness.
Step 5: Use Lens Shift Instead of Tilt
Lens shift allows you to move the image vertically or horizontally without tilting the projector. Tilting the projector changes the angle of projection, which can concentrate light in the center and create a hotspot. Proper use of lens shift maintains a flat image on the screen and prevents uneven brightness. If your projector is blurry or uneven, lens shift adjustment may be the easiest way to fix hotspots without repositioning the entire setup.
Step 6: Adjust Brightness and Contrast Settings
Hot spots can be exacerbated by overly high brightness or incorrect contrast settings. Reducing the projector brightness slightly and adjusting contrast can help smooth out concentrated light areas. Testing with real content rather than test patterns gives a better sense of how the adjustments affect image uniformity. If my projector is blurry in certain regions, fine-tuning brightness and contrast can help reduce perceived hotspots.
Step 7: Regular Maintenance and Cleaning
Dust and dirt on the lens or internal optics can also cause uneven light distribution. A dirty lens may scatter light unpredictably, leading to bright spots in certain areas. Regular cleaning and maintenance ensure that the projector produces a consistent, sharp image. This simple step can address why is my projector blurry even when placement and alignment seem correct.
Step 8: Multi-Projector Blending Considerations
In setups with multiple projectors, overlapping images incorrectly can create hotspots where the images intersect. Proper mapping, blending, and calibration are essential. Using software to adjust overlap and brightness ensures that each projector contributes evenly to the final image. Misalignment in a multi-projector setup is a common reason why is my projector blurry in certain zones while appearing fine elsewhere.
Tips to Avoid Hot Spots
-
Measure throw distance and position projectors accurately.
-
Use adjustable mounts to align the projector perfectly with the screen.
-
Adjust focus at multiple points on the screen.
-
Select a screen with appropriate gain for your projector and room lighting.
-
Utilize lens shift instead of tilting the projector.
-
Fine-tune brightness and contrast settings to achieve uniform illumination.
-
Keep the projector lens and optics clean to avoid scattering light.
-
For multi-projector setups, use blending software for seamless coverage.
Conclusion
Hot spots are a common issue that can make a projected image look uneven and less professional. XTEN-AV emphasizes that correct placement, alignment, focus, and screen selection are key to avoiding this problem. If you are asking why is my projector blurry or how to fix blurry projector issues, addressing hotspot causes is often the solution.
By following these steps, you can ensure a uniform, sharp, and visually pleasing image across your entire screen. Proper planning, careful adjustments, and routine maintenance are crucial for preventing hotspots and maintaining the high-quality projection experience that every viewer deserves.
Read more: https://jordansheel.in/what-are-the-most-common-projector-placement-mistakes/
