

Photography Secrets That Help Living Rooms Look More Spacious
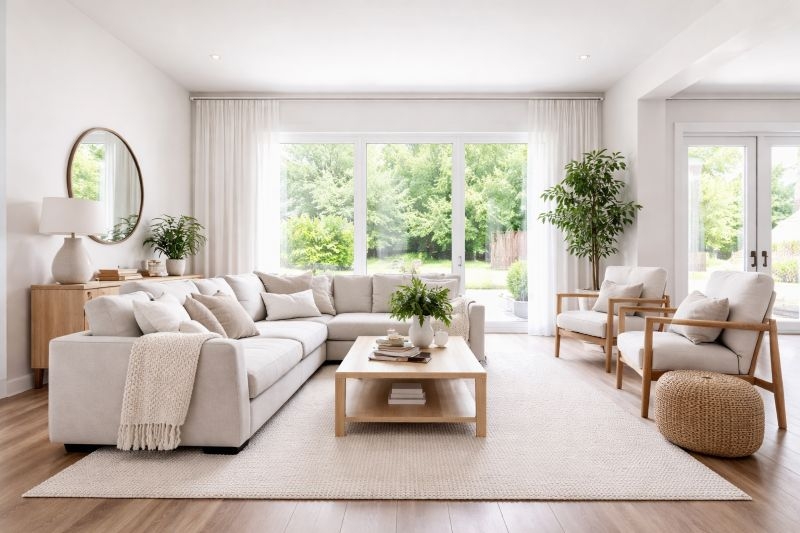
A living room photo often decides whether a buyer keeps scrolling or schedules a showing. Square footage matters, but perception matters more. In real estate photography, especially in competitive markets like Houston, small visual tweaks can make an average living room feel open, bright, and inviting. These changes don’t require renovations or expensive furniture. They rely on smart preparation, thoughtful styling, and a clear understanding of how cameras interpret space.
At Pro Photo Listings, we’ve seen firsthand how minor adjustments can dramatically improve listing performance. Below is a detailed, results-driven guide to simple, proven techniques that make living rooms look bigger in photos.
Why Living Room Size Perception Matters in Real Estate Photography
Buyers rarely measure rooms with their eyes. Instead, they rely on visual cues: light, angles, balance, and flow. Professional real estate photography houston services focus on these elements because online photos shape expectations long before a buyer steps inside.
A room that feels tight or cluttered on camera can discourage interest, even if it feels fine in person. On the other hand, a thoughtfully prepared living room photographed correctly can appear larger than its actual dimensions. That perception leads to more clicks, longer listing views, and more showings.
Declutter Beyond the Obvious
Most homeowners know to remove clutter, but effective decluttering for photography goes further.
Remove Visual Noise
Too many small items create visual breaks that shrink a room. Coffee table décor, stacks of magazines, excess pillows, and floor baskets should be minimized. Aim for a few intentional pieces rather than many decorative accents.
Simplify Surfaces
Side tables, TV consoles, and shelves should not be full. Leave breathing room around objects. Negative space helps the camera define boundaries more clearly, making the room feel larger.
Edit Furniture, Not Just Items
If the living room has extra chairs, ottomans, or side tables that aren’t necessary, remove them temporarily. One less piece of furniture can significantly improve visual flow.
Use Furniture Placement to Create Space
How furniture is positioned matters as much as what furniture is used.
Pull Furniture Away From Walls (Slightly)
Pushing everything flush against walls can flatten depth in photos. Pulling sofas and chairs out by just a few inches creates shadow lines that add dimension.
Float When Possible
If the room allows, floating a sofa with a visible walkway behind it can make the space appear wider. This technique works well in open-concept Houston homes.
Keep Pathways Clear
Clear walking paths signal functionality and openness. If a chair blocks a natural walkway, it should be moved before photos are taken.
Choose the Right Scale of Furniture
Oversized furniture is one of the most common reasons living rooms look smaller in photos.
Avoid Bulky Arms and Thick Bases
Chunky sofas and recliners visually eat up space. For photography, slimmer silhouettes photograph better, even if the furniture stays for daily living.
Balance Large Pieces With Light Ones
If a large sectional is unavoidable, balance it with lighter chairs or transparent elements like glass tables. This contrast helps the room feel less crowded.
Maximize Natural Light
Light is one of the most powerful tools in real estate photography.
Open All Window Treatments
Curtains and blinds should be fully open unless privacy is an issue. Natural light expands walls and reduces harsh shadows.
Clean Windows Thoroughly
Dirty windows reduce brightness and clarity. Clean glass allows more light and improves overall photo quality.
Replace Dim Bulbs
Every light in the living room should work and match in color temperature. Soft white or daylight bulbs prevent uneven lighting that can shrink a space visually.
Use Color Strategically
Color choices strongly influence perceived size.
Stick to Light, Neutral Palettes
Light grays, warm whites, and soft beiges reflect light and make rooms feel open. Dark accent walls can look stylish in person but often reduce visual space in photos.
Keep Contrast Minimal
High contrast between walls, floors, and furniture creates visual stops. A cohesive palette allows the eye to move smoothly across the image.
Add Subtle Pops Carefully
One or two accent colors in pillows or art are fine, but too many bold colors can make a room feel busy and smaller.
Optimize Wall Décor and Art Placement
Walls frame the room, and what’s on them affects scale.
Use Larger Art, Fewer Pieces
One medium-to-large art piece often photographs better than multiple small frames. Too many small items break up the wall visually.
Hang Art at Proper Height
Art hung too high or too low distorts proportions. The center of the artwork should sit roughly at eye level to maintain balance.
Avoid Overcrowding
Leave some wall space empty. Blank areas help define the room’s size.
Rugs Can Make or Break the Space
Rugs are often overlooked, but they play a major role in scale.
Use the Right Size Rug
A rug that’s too small makes the room feel cramped. Ideally, at least the front legs of sofas and chairs should sit on the rug.
Keep Patterns Simple
Busy patterns draw attention and reduce perceived space. Solid or subtle designs photograph best.
Align the Rug Properly
A crooked rug or one that’s misaligned with furniture can make the room feel awkward and smaller.
Leverage Camera Angles and Perspective
This is where professional photography truly shines.
Shoot From Corners
Corner angles show more of the room, helping buyers understand layout and size.
Maintain Proper Camera Height
Shooting too high or too low distorts walls. Experienced photographers use proven heights that keep vertical lines straight and proportions accurate.
Avoid Overuse of Ultra-Wide Lenses
Wide lenses are helpful, but excessive distortion can mislead buyers. Trusted, industry-leading photographers balance width with realism.
Case Study: A Houston Listing Transformation
A recent Pro Photo Listings project involved a mid-range Houston home with a modest-sized living room. The initial listing photos, taken by the homeowner, showed dark corners, crowded furniture, and heavy drapes. The room appeared smaller than it actually was.
Our team recommended simple, affordable changes:
-
Removed one accent chair and a side table
-
Swapped dark curtains for sheer panels
-
Repositioned the sofa slightly off the wall
-
Added a larger neutral rug
-
Replaced mismatched bulbs with consistent lighting
The professional photos told a different story. The living room appeared brighter, wider, and more functional. The listing received noticeably more online engagement within the first week and generated multiple showings. No renovations were done, only strategic preparation and high-performance photography.
Why Professional Photography Makes These Tweaks Work
Even the best staging can fall flat without proper execution. A well-experienced real estate photography team understands how to capture space accurately while highlighting its strengths. In a competitive market, working with a top-rated, reliable provider ensures these simple tweaks translate into real results.
Pro Photo Listings uses cutting-edge techniques and a user-friendly process to help agents and sellers present properties at their best. The goal is always the same: photos that feel honest, inviting, and spacious.
Final Thoughts
Making a living room look bigger in photos isn’t about trickery. It’s about clarity, balance, and thoughtful preparation. Decluttering, adjusting furniture, improving light, and working with proven professionals can transform how a space is perceived online.
When done correctly, these simple tweaks don’t just improve photos. They improve buyer confidence, listing performance, and overall results.
