

Professional Tips for Brightening Rooms With Dark Wall Colors
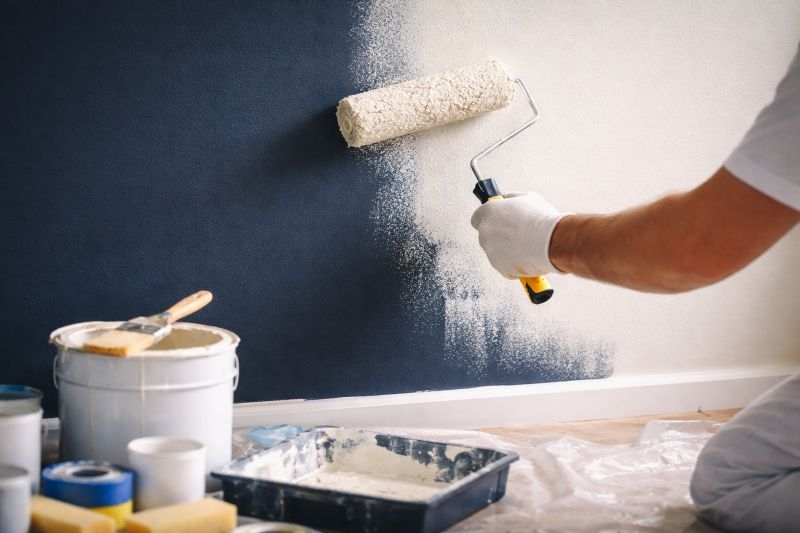
Dark wall colors can bring drama and personality into a space, but they can also create challenges when it’s time for a change. Whether you’re moving into a new home or refreshing your current one, covering deep shades like navy, burgundy, charcoal, or forest green requires more than a simple coat of paint. Achieving full coverage and smooth, clean results takes careful preparation, quality materials, and professional techniques.
Homeowners often turn to experienced painting contractors in Bellingham WA for dependable results because repainting dark walls demands precision and patience. With the right approach, however, you can transform even the darkest room into a bright, welcoming space that looks professionally finished.
Why Dark Walls Are Harder to Paint Over
Dark colors contain more pigment, which makes them harder to conceal. If you apply lighter paint directly over a deep shade, the original color often shows through. This leads to uneven coverage, patchy spots, and a finish that never fully looks complete.
Several factors make the process more complex:
-
Dark pigments bleed through lighter paints
-
Surface imperfections become more visible under new colors
-
Uneven primer or paint layers create streaks
-
Poor lighting during painting can hide missed spots
Without the right methods, covering dark walls may require extra coats, which can increase cost and labor. A results-driven approach ensures fewer coats and a cleaner finish.
Step 1: Start With Proper Surface Preparation
Preparation is the foundation of any high-performance paint job. Skipping this step often leads to peeling, uneven color, and poor adhesion.
Begin by cleaning the walls thoroughly. Dust, grease, and residue prevent paint from bonding properly. Use mild soap and water or a wall cleaner designed for painted surfaces. Kitchens and high-traffic areas may require degreasing solutions.
Next, inspect the walls for imperfections:
-
Fill nail holes and dents with spackle
-
Sand rough areas until smooth
-
Repair cracks or peeling paint
-
Remove old adhesive or wallpaper residue
After repairs, lightly sand the entire surface. This creates a slightly rough texture that allows primer and paint to adhere more effectively. Wipe away dust using a damp cloth before moving forward.
Well-prepared walls give painting contractors a reliable base for smooth, consistent coverage.
Step 2: Choose the Right Primer
Primer is essential when painting over dark walls. It blocks the old color and creates a neutral base for the new paint. Skipping primer almost always leads to uneven results and extra coats of paint.
Use a high-quality, stain-blocking primer specifically designed for strong color transitions. In many cases, a tinted primer works best. For example:
-
Use gray-tinted primer when covering very dark colors
-
Use white primer when transitioning to bright or pastel shades
-
Consider specialty primers for glossy or oil-based surfaces
Applying primer evenly is critical. Use a roller for large areas and a brush for corners and edges. Allow it to dry completely before applying paint.
Trusted professionals often recommend two coats of primer when covering extremely dark shades. While this adds an extra step, it can significantly reduce the number of paint coats needed later.
Step 3: Select High-Quality Paint
Not all paints provide the same level of coverage. When painting over dark walls, investing in top-rated, high-performance paint makes a noticeable difference.
Look for paints labeled as:
-
High-hide or full-coverage
-
Premium interior paint
-
Paint-and-primer combinations (used with caution)
While paint-and-primer-in-one products can be effective for minor color changes, they may not fully cover deep shades on their own. In most cases, using a separate primer and premium paint delivers better, long-lasting results.
Choose a finish that suits the space:
-
Matte or eggshell for living rooms and bedrooms
-
Satin or semi-gloss for kitchens and bathrooms
-
Durable finishes for high-traffic areas
Reliable paints provide smoother application, better durability, and more consistent color.
Step 4: Apply Paint Using Professional Techniques
Application technique matters just as much as product quality. Even the best paint can look uneven if applied incorrectly.
Start by cutting in around edges with a high-quality angled brush. This creates clean lines along ceilings, baseboards, and corners. Then use a roller for larger wall sections.
For best results:
-
Use a roller with the correct nap thickness for your wall texture
-
Apply paint in a “W” pattern for even distribution
-
Maintain a wet edge to avoid lap marks
-
Avoid overloading the roller with paint
Two to three coats of paint are typically required to fully cover dark walls. Allow each coat to dry completely before adding another. Rushing this step can cause streaking or peeling.
Well-experienced painters focus on consistency and patience to achieve a smooth, uniform finish.
Step 5: Check Lighting and Final Touches
Lighting plays a major role in how paint appears. After applying the final coat, inspect the walls under both natural and artificial light. This helps reveal any thin spots or missed areas.
Touch up imperfections carefully using a small brush or roller. Ensure the paint blends seamlessly with the surrounding surface.
Clean lines around trim and ceilings enhance the final result. Removing painter’s tape while the paint is slightly damp helps prevent peeling and creates crisp edges.
Attention to detail separates a standard paint job from an industry-leading finish.
Real-World Example: Transforming a Dark Living Room in Bellingham
A homeowner in Bellingham recently purchased a house with deep navy walls throughout the main living area. While the color suited the previous owner’s style, it made the space feel smaller and darker than desired.
The homeowner wanted a soft, warm white to brighten the room. Initially, they tried applying paint directly over the navy walls, but the dark color showed through even after two coats. Frustrated with uneven coverage, they contacted Next Step Painting for professional assistance.
The painting team began with thorough wall cleaning and minor repairs. They applied a gray-tinted primer to neutralize the navy color and followed with two coats of premium white paint. Using proven techniques and high-performance materials, they achieved complete coverage without streaks or patchiness.
The transformation was dramatic. Natural light reflected more evenly, and the room appeared larger and more inviting. The homeowner noted that working with experienced painting contractors in Bellingham WA saved time, reduced wasted paint, and delivered a flawless finish.
This case highlights how preparation, product selection, and professional application can make a significant difference when covering dark walls.
When to Call Professional Painters
While many homeowners attempt DIY painting projects, covering dark walls can quickly become overwhelming. Professional painters bring tools, techniques, and experience that ensure efficient, clean results.
Consider hiring professionals if:
-
Walls require extensive repairs or sanding
-
The current color is extremely dark or glossy
-
Large areas need repainting
-
Time is limited
-
You want guaranteed, long-lasting results
A trusted, well-experienced painting team delivers consistent quality and minimizes disruptions. Professional services are often more affordable in the long run by preventing costly mistakes and repainting.
Maintaining Freshly Painted Walls
Once your new color is complete, proper maintenance helps preserve its appearance.
-
Clean walls gently with a damp cloth
-
Address stains quickly to prevent buildup
-
Avoid harsh chemicals that damage paint
-
Touch up small marks as needed
High-performance paint combined with proper care keeps walls looking fresh for years.
Why Quality Matters
Painting over dark walls isn’t just about changing color. It’s about creating a clean, polished environment that reflects light and enhances the overall feel of your home. Using reliable methods and proven materials ensures results that stand the test of time.
Working with a top-rated company like Next Step Painting gives homeowners confidence in the final outcome. From preparation to finishing touches, every step contributes to a smooth, professional result that transforms any space.
A well-executed paint project improves both aesthetics and property value. Whether refreshing a single room or repainting an entire home, careful planning and expert techniques deliver a finish that feels truly complete.
